Preview
Below you see the stylized push button we will create with Haskell.
Notice how the button class and its inner contents change with every mouse click.
Setup
In order to establish our build pipeline, we will need to setup our environment with a few tools, directories, and project files.
Stack
Stack will handle all of our Haskell environment needs from installing the compiler to managing our Haskell dependencies. The instructions contain all of the installation information you will need.
For a general Linux installation you could do:
cd Downloads
wget https://www.stackage.org/stack/linux-x86_64
tar xvzf stack-1.1.2-linux-x86_64.tar.gz
cd ~
echo 'export PATH="$HOME/Downloads/stack-1.1.2-linux-x86_64/:$PATH"' >> .bashrc
source .bashrc
# Or if you use ZSH.
echo 'export PATH="$HOME/Downloads/stack-1.1.2-linux-x86_64/:$PATH"' >> .zshrc
source .zshrc
stack
Project Directory
With Stack installed, we will need to create our project directory.
cd ~
mkdir -p onOffButton
We will also need to define some additional directories for our project.
cd ~/onOffButton
mkdir -p app dist src static/scss
With the directories in place, create the empty project files.
cd ~/onOffButton
touch app/Main.hs src/Lib.hs static/scss/style.scss
YAML
To use Stack, you will need to define a stack.yaml file in the root of the directory.
cd ~/onOffButton
touch stack.yaml
Go ahead and open this file with your favorite text editor and copy this information into the stack.yaml file.
resolver: lts-6.4
packages:
- '.'
extra-deps:
  - haskell-src-exts-1.16.0.1
  - ref-tf-0.4
  - reflex-0.4.0
  - reflex-dom-0.3
  - hlint-1.9.35
flags: {}
extra-package-dbs: []
compiler: ghcjs-0.2.0.20160414_ghc-7.10.3
compiler-check: match-exact
setup-info:
  ghcjs:
    source:
      ghcjs-0.2.0.20160414_ghc-7.10.3:
        url: https://s3.amazonaws.com/ghcjs/ghcjs-0.2.0.20160414_ghc-7.10.3.tar.gz
        sha1: 6d6f307503be9e94e0c96ef1308c7cf224d06be3
Cabal
We will also need an onOffButton.cabal file which Stack will use to build our project. Make sure this file is located in the root of the project.
cd ~/onOffButton
touch onOffButton.cabal
Go ahead and open this file with your favorite text editor and copy this information into the onOffButton.cabal file.
name:                onOffButton
author:              David Lettier
version:             0.0.0.1
build-type:          Simple
cabal-version:       >=1.10

library
  hs-source-dirs:      src
  exposed-modules:     Lib
  build-depends:       base
                     , haskell-src-exts >= 1.16 && < 1.18
                     , reflex == 0.4.0
                     , reflex-dom
                     , containers == 0.5.*
                     , safe == 0.3.*
  default-language:    Haskell2010

executable onOffButton-exe
  hs-source-dirs:      app
  main-is:             Main.hs
  ghc-options:         -threaded -rtsopts -with-rtsopts=-N
  build-depends:       base
                     , onOffButton
                     , haskell-src-exts >= 1.16 && < 1.18
                     , reflex == 0.4.0
                     , reflex-dom
                     , containers == 0.5.*
                     , safe == 0.3.*
  default-language:    Haskell2010
GHCJS
GHCJS will be our main dependency. This is the dependency that will help transpile our Haskell source code to JavaScript.
At this point we can finish the Stack setup.
cd ~/onOffButton
stack setup # This will take awhile.
NVM
To make building the project easier, we will use some NPM scripts but first we need to install Node.js using NVM.
cd ~/Downloads
wget -qO- https://raw.githubusercontent.com/creationix/nvm/v0.31.2/install.sh | bash
cd ~/onOffButton
echo 'v4.0.0' > .nvmrc
nvm use
NPM Package
Our build scripts will be defined in a NPM package.json file.
cd ~/onOffButton
touch package.json
Open up your favorite text editor and copy this into the package.json file.
{
  "name": "onOffButton",
  "author": "David Lettier",
  "scripts": {
    "scss": "mkdir -p dist/ && node-sass --output-style compressed static/scss/style.scss dist/css/style.css",
    "autoprefixer": "postcss -u autoprefixer -r dist/css/style.css dist/css/style.css",
    "uglify": "mkdir -p dist/ && uglifyjs dist/lib.js -o dist/lib.js -c -m && uglifyjs dist/rts.js -o dist/rts.js -c -m && uglifyjs dist/out.js -o dist/out.js -c -m",
    "copy:stackbuild": "mkdir -p dist/ && cp -R ./.stack-work/install/x86_64-linux/lts-6.4/ghcjs-0.2.0_ghc-7.10.3/bin/onOffButton-exe.jsexe/. dist",
    "clean:haskell:full": "stack clean --full",
    "clean:haskell": "stack clean",
    "clean:dist": "rm -rf dist && mkdir -p dist/",
    "clean:all": "npm run clean:haskell && npm run clean:dist",
    "build:js": "stack build && npm run copy:stackbuild && npm run uglify",
    "build:css": "npm run scss && npm run autoprefixer",
    "build:dist": "mkdir -p dist/ && npm run build:js && npm run build:css",
    "serve": "browser-sync start --server 'dist/' --files 'dist/css/*.css, dist/*.js, **/*.html, !node_modules/**/*.html'",
    "watch:index": "onchange 'app/Main.hs' -- npm run build:js",
    "watch:css": "onchange 'static/scss/*.scss' -- npm run build:css",
    "watch:all": "npm-run-all -p serve watch:index watch:css"
  },
  "devDependencies": {
    "autoprefixer": "^6.3.1",
    "browser-sync": "^2.11.1",
    "node-sass": "^3.4.2",
    "npm-run-all": "^1.5.1",
    "onchange": "^2.0.0",
    "postcss-cli": "^2.4.0",
    "uglify-js": "^2.6.1"
  }
}
This will allows us to perform commands like npm run build:js and have our transpiled JavaScript files located in dist/.
Before we can run any NPM scripts, we must install all of our Node.js build dependencies.
cd ~/onOffButton
npm install
Source Code
Now that our development environment is setup, we can begin coding our project.
Haskell
The majority of the source code will be written in Haskell. If you have never programmed in Haskell before do not worry as we will cover each part line by line.
Setup
The first file we will create is the simplest.
cd ~/onOffButton
touch Setup.hs
The Setup.hs file is located below.
import Distribution.Simple
main = defaultMain
Here we import the distribution simple package and define the main entry point as defaultMain.
This is the command line front end to the Simple build system. When given the parsed command-line args and package information, is able to perform basic commands like configure, build, install, register, etc.
Main
The next file we need to write is the app/Main.hs file which is the starting point of our Haskell to JavaScript project.
cd ~/onOffButton
touch app/Main.hs
{-# LANGUAGE OverloadedStrings #-}This language extension allows us to take a string literal such as "Some text." and use it for arguments that require type ByteString, Text, or String/[Char] (a ['l','i','s','t'] or array of characters).
import Lib
import Reflex
import Reflex.Dom
import qualified Data.Map as Map
The first import is our own project library that we will define in src/Lib.hs later on. The two Reflex and Reflex.Dom imports are related to the Reflex-FRP project. These two packages together will help us write Haskell code that will translate to JavaScript and HTML. The last import–Map–allows us to define hash tables with keys and values.
main :: IO ()
main = mainWidgetWithHead headElement bodyElement
This is the entry or starting point of our application. The first line defines its output as an empty IO context or input-output monad unit. Think of () as void. The second line equates the main function to mainWidgetWithHead which takes two arguments. The first argument is the HTML head section <head><!--...--></head> while the second argument defines the HTML body section <body><!--...--></body>.
headElement :: MonadWidget t m => m ()
headElement = do
Here we begin the headElement function definition. Its type declaration says that, given that the MonadWidget interface (type-class) is defined for some type m, it returns a m empty context or monad unit. In the second line we begin the do block.
el "title" (text "On/Off Button")This function takes a HTML tag name and some text that will go inside the HTML tag. After we build the project, this line will translate to <title>On/Off Button</title>. Note that el is short for element.
  styleSheet "css/style.css"
  styleSheet "https://maxcdn.bootstrapcdn.com/font-awesome/4.6.3/css/font-awesome.min.css"
styleSheet is a function we define below. It takes a single argument–the location of the style sheet. We will be using some icons so we will need Font Awesome.
  where
    styleSheet link = elAttr "link" (Map.fromList [
          ("rel", "stylesheet")
        , ("type", "text/css")
        , ("href", link)
      ]) $ return ()
Our style sheet function takes a string (the href value) and returns an element with three attributes defined. This will translate to <link rel="stylesheet" type="text/css" href=link />. Notice how we use the Map package here–defining three keys and values which become the element’s attributes.
bodyElement :: MonadWidget t m => m ()
bodyElement = el "div" $ onOffButton
Our bodyElement function takes no arguments and creates a parent div element which holds whatever element(s) is/are returned by the onOffButton function defined in src/Lib.hs.
<!--...-->
  <div>
    <!-- onOffButton output -->
  </div>
<!--...->
Here is app/Main.hs in its entirety.
{-
  David Lettier (C) 2016.
  http://www.lettier.com/
-}

{-# LANGUAGE OverloadedStrings #-}

import Lib
import Reflex
import Reflex.Dom
import qualified Data.Map as Map

main :: IO ()
main = mainWidgetWithHead headElement bodyElement

headElement :: MonadWidget t m => m ()
headElement = do
  el "title" (text "On/Off Button")
  styleSheet "css/style.css"
  styleSheet "https://maxcdn.bootstrapcdn.com/font-awesome/4.6.3/css/font-awesome.min.css"
  where
    styleSheet link = elAttr "link" (Map.fromList [
          ("rel", "stylesheet")
        , ("type", "text/css")
        , ("href", link)
      ]) $ return ()

bodyElement :: MonadWidget t m => m ()
bodyElement = el "div" $ onOffButton
Lib
{-# LANGUAGE RecursiveDo #-}This language extension allows us to do something like this:
someFuncZero = do
  rec
    a <- someFuncOne b
    b <- someFuncTwo a
  return ()
Notice how a depends on b and b depends on a and a depends on b and … recursively.
module Lib (
  onOffButton
) where
Our main application file, app/Main.hs, relies on the onOffButton function. In order to access it, we export it from our library src/Lib.hs.
import Reflex
import Reflex.Dom
import qualified Data.Map as Map
These imports are the same as the ones in app/Main.hs.
onOffButton :: MonadWidget t m => m ()
onOffButton = do
The function onOffButton takes no arguments and produces a push button on the generated HTML page.
  rec
    let onButtonClass  = Map.singleton "class" "onButton"
    let offButtonClass = Map.singleton "class" "offButton"
Here we define two hashes which only contain a single key and value each. These will specify the class="..." attribute for the <button></button> element we generate below.
(buttonElement, _) <- elDynAttr' "button" cssClassDynamic $ elDynHtml' "span" textDynamicThe main element on the page will be our button. Its CSS class is dynamic (will change). The CSS class is different based on the button’s state. The button has two states: down or up.
elDynAttr' generates an element that has dynamic attributes and returns a tuple containing the element created and a monad. We will only use the returned element buttonElement. The function elDynHtml' generates an element that has dynamic inner HTML. The $ function, in this context, will set the element generated by elDynHtml' as the child of the element generated by elDynAttr'.
This line will roughly translate to:
<!--...-->
  <button class="...">
    <span><!--...--></span>
  </button>
<!--...-->
buttonElementClickEvent <- return $ domEvent Click buttonElement
toggleDynamic <- toggle False buttonElementClickEventHere we setup a toggling dynamic that starts off with a False value. Every time the button is clicked, the toggleDynamic will flip to !toggleDynamic (false, true, false, true, …).
cssClassDynamic <- mapDyn (
\ x -> if x then (
onButtonClass :: Map.Map String String
) else (
offButtonClass :: Map.Map String String
)
) toggleDynamicUsing the x value extracted from the toggle dynamic, we return either the “on” CSS class (if the toggle is true) or we return the “off” CSS class (if the toggle is false). The Map.Map String String parts are type annotations which say that on/OffButtonClass has a type where the hash key and value are type String. The ( \ x -> ... ) syntax is a lambda or anonymous function.
textDynamic <- mapDyn (
\ x -> if x then (
"<i class='fa fa-circle-o-notch' aria-hidden='true'></i>" :: String
) else (
"<i class='fa fa-power-off' aria-hidden='true'></i>" :: String
)) toggleDynamic
return ()Similar to the cssClassDynamic, we define the dynamic inner HTML based on the x value extracted from toggleDynamic. True evaluates to the Font Awesome icon fa-circle-o-notch while False evaluates to the Font Awesome icon fa-power-off. These icons will show up on the face of the button and will swap with each button press.
Here is src/Lib.hs in its entirety.
{-
David Lettier (C) 2016.
http://www.lettier.com/
-}
{-# LANGUAGE RecursiveDo #-}
module Lib (
onOffButton
) where
import Reflex
import Reflex.Dom
import qualified Data.Map as Map
onOffButton :: MonadWidget t m => m ()
onOffButton = do
rec
let onButtonClass = Map.singleton "class" "onButton"
let offButtonClass = Map.singleton "class" "offButton"
(buttonElement, _) <- elDynAttr' "button" cssClassDynamic $ elDynHtml' "span" textDynamic
    buttonElementClickEvent <- return $ domEvent Click buttonElement
    toggleDynamic <- toggle False buttonElementClickEvent
    cssClassDynamic <- mapDyn (
        \ x -> if x then (
          onButtonClass :: Map.Map String String
        ) else (
          offButtonClass :: Map.Map String String
        )
      ) toggleDynamic
    textDynamic <- mapDyn (
        \ x -> if x then (
          "<i class='fa fa-circle-o-notch' aria-hidden='true'></i>" :: String
        ) else (
          "<i class='fa fa-power-off' aria-hidden='true'></i>" :: String
      )) toggleDynamic
return ()SCSS
To make the button more visually appealing we will style it using Sass.
cd ~/onOffButton
touch static/scss/style.scss
Here is the static/scss/style.scss file in its entirety.
body {
  margin:  0px;
  padding: 0px;
  background-color: #252b3a;
}
div {
  text-align: center;
}

$buttonSize: 300px;

button {
  width:  $buttonSize;
  height: $buttonSize;
  border-radius: 100%;
  border-width: 20px;
  border-color: #546170;
  font-size: 50px;
  color: white;
  text-shadow: 0px 0px 40px whitesmoke;
  position: absolute;
  top: 40%;
  outline: none;
  cursor: pointer;
  margin-left: $buttonSize / 2 * -1;
}
.offButton {
  background-color: #db5461;
  border-style: outset;
}
.onButton {
  background-color: #54d367;
  border-style: inset;
}
Notice the .offButton and .onButton CSS classes.
Build
With our source code files in place, we can build our project and view it in the browser.
cd ~/onOffButton
nvm use
npm run build:dist
npm run watch:all
The final project structure is shown below.
onOffButton/
  app/
    Main.hs
  dist/
    css/
      style.css
    all.js
    lib.js
    out.js
    rtl.js
    runmain.js
    index.html
  node_modules/
    ...
  src/
    Lib.hs
  static/
    scsss/
      style.scss
  onOffButton.cabal
  package.json
  Setup.hs
  stack.yaml
  .nvmrc
Output
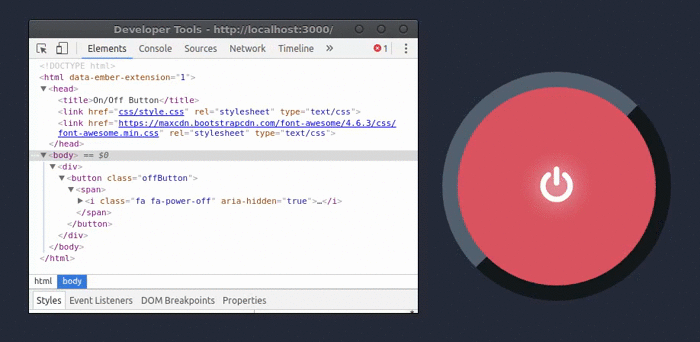
After opening dist/index.html in your browser, the following output will be produced.
<html>
  <head>
    <title>On/Off Button</title>
    <link href="css/style.css" rel="stylesheet" type="text/css">
    <link href="https://maxcdn.bootstrapcdn.com/font-awesome/4.6.3/css/font-awesome.min.css" rel="stylesheet" type="text/css">
  </head>
  <body>
    <div>
      <button class="offButton">
        <span>
          <i class="fa fa-power-off" aria-hidden="true"></i>
        </span>
      </button>
    </div>
  </body>
</html>
Recap
Using an array of tools and the Haskell programming language, we built a push button interface for a web browser. All of our Haskell source code was transpiled to HTML and JavaScript.
If you enjoyed programming in Haskell, be sure to read Building a Haskell Web API.